
What are brine shrimp?
The non-scientific short answer: brine shrimp are fish food that will drive your reef fish crazy.
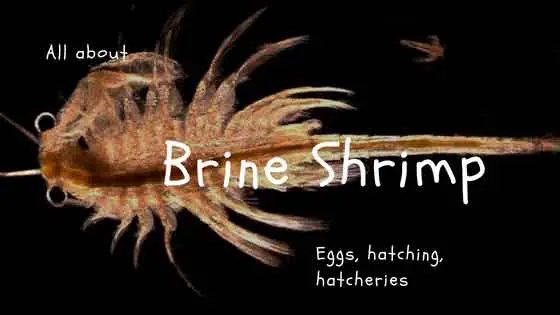
The more specific answer: brine shrimp are tiny invertebrates (arthropod crustaceans really), from the genus Artemia, that naturally grow in salt lakes.
When fully grown, they are about 0.4-0.5 inches in length (about 1 centimeter)–which means they are totally bite-sized for almost any of your saltwater fish.
What do they eat?
Newly hatched brine shrimp, called nauplii, do not eat. They hatch from their cyst/egg with a relatively large yolk-sack attached and deplete that first.
Adult brine shrimp are filter-feeders, which means they swim through the water and eat whatever is suspended in the water column.Wild brine shrimp commonly eat phytoplankton.
When grown specifically for food, they are often fed even tinier yeast cells. When I was growing them out for feeding my baby clownfish, I fed them with nutrient-dense phytoplankton, because I wanted to fill their little guts full of the stuff, so that my clownfish would get the benefits, too.
Gut-loading is a key concept here: by feeding brine shrimp highly nutritious foods (like phytoplankton or specialized enrichment diets) shortly before offering them to your fish, you can maximize the nutritional value transferred to your aquarium inhabitants. Freshly hatched nauplii are naturally rich in yolk and highly nutritious, but older brine shrimp that have not been fed will quickly become depleted and offer little more than empty calories. For best results, feed (gut-load) adult brine shrimp for several hours before use, and use nauplii within a few hours of hatching.
You can learn to grow your own phytoplankton at home here.
Ideal water parameters
Reading up on this, there are mixed reviews about what is recommended or ideal.
According to Wikipedia, the optimal salinity level for brine shrimp is about 30–35 g/L but since many other organisms that would consider the brine shrimp a tasty morsel also think 30-35 g/L is a great salinity level, they are often found inhabiting much more hostile salinities (60-80 g/L or more).
That means natural seawater water parameters are approximately ‘ideal’, but they are commonly found in bodies of water with 2x the amount of salt as natural seawater.
So swimming around in your tank water is a walk in the park…which is a terrible analogy, because that would be extremely difficult for a brine shrimp to do.
According to brineshrimpdirect, a company dedicated to selling brine shrimp cysts for the aquarium hobby, the recommended specific gravity for hatching brine shrimp is 1.018, or 25 g/L, which is actually less than what is otherwise reported as ideal.
I speculate that the reason they recommend a salinity level that is lower is that…close enough is good enough in this case–and if you look at the economics of using a lot of extra salt, vs. hatching a few more cysts, you’d be better off just buying and adding more cysts.
The other conclusion you can make here is that you don’t have to be too precise when making up your water. Close enough will likely be good enough.
Why salinity matters: Brine shrimp are famous for their extreme tolerance to high salinity, which is actually a survival strategy. At higher salinities (above 50 g/L), most predators, protozoa, and bacteria cannot survive, so brine shrimp cysts and nauplii face less competition and risk of contamination. However, hatch rates tend to be highest at lower salinities (around 25–35 g/L), which also allows more contaminants to thrive. If your goal is to maximize hatch rates and yield, use the lower end of the salinity range (1.015–1.020 specific gravity). If you are struggling with contamination, fouling, or unwanted organisms, increasing salinity to 40–60 g/L (1.030–1.045 SG) can help suppress these issues, though hatch rates may decrease somewhat.
Practical advice: For most hobbyists, a specific gravity of 1.018–1.022 (25–30 g/L) is a good balance. If you notice poor hatch rates, try adjusting salinity slightly lower. If you see contamination or fouling, try a higher salinity next time. Experienced aquarists may adjust salinity based on their operational goals: maximize yield with lower salinity, minimize contamination with higher salinity.
Brine shrimp life cycle
I’m conflicted about whether or not the brine shrimp life cycle is complicated…or expected. As far as tiny invertebrates go, I suppose it’s expected and not unusual, but for such a tiny creature, there really is a fair amount of intricacy…which is cool.
Technically speaking, when having dinner with your invertebrate scientist friends, please note that there are 14-17 different stages in the artemia life cycle. Practically speaking, for those of us in professions that don’t depend on that specificity and expert knowledge, there are 4 major stages (with a bunch of intermediate stages in between. Those are:
- Cyst
- Nauplii
- Juvenile
- Adult
Understanding these stages is important for aquarists: nauplii (newly hatched) are the most nutritious for fish fry, as they are rich in yolk. As brine shrimp mature into juveniles and adults, their nutritional profile changes, and unless gut-loaded, they become less valuable as food. Harvest nauplii within hours of hatching for maximum benefit, and use adults for larger fish or for gut-loading with specific nutrients.
Hatching brine shrimp
Hatching brine shrimp from cysts is relatively easy to do. Given the right water conditions, the cysts want to hatch.
- Mix up some aquarium water with a specific gravity of 1.018 or higher
(Salinity in this range balances hatch rate and contamination risk. See above for details.)
- Consider heating it up to 80 degrees F, if reasonable (I’ve skipped this and hatched them at room temperature–the hatch will just be slower and possibly yield fewer shrimps–but you’ll still get a bunch)
(Higher temperatures speed up metabolism and hatching, but avoid overheating. Room temperature works, but expect slower results.)
- Add an airline tube set with a moderate to heavy bubbling
(Aeration keeps cysts suspended, ensures even temperature, and provides oxygen. Without it, cysts settle and hatch rates drop.)
- Measure ½ teaspoon of cysts for every liter of water volume and add them to the bubbling water
(Overloading with cysts can deplete oxygen and foul the water, reducing hatch success. Stick to recommended density.)
- Wait about a day
(Most will hatch within 18–36 hours, depending on temperature.)
To view your newly hatched nauplii, shut off the air pump, to allow the water to settle. Move a light or flashlight close to the container. You can do this with just about any light, but the key here is that you want it to be relatively bright and you want the point of light to be relatively small/concentrated in a small area…because…the brine shrimp will travel to the light.
(The nauplii are positively phototactic—they swim toward light, which makes collection easier.)
The best spot to point the light is somewhere below the waterline because the empty cyst shells will float and the brine shrimp will swim down to the light.
To remove the nauplii, just suck them up with a turkey baster or start a siphon with a length of airline tubing.
Common hatching problems and troubleshooting:
- Poor hatch rates: Check temperature (too low slows hatching), salinity (too high or low can reduce yield), cyst age/quality, and aeration (insufficient oxygen).
- Fouling/cloudy water: Overloading cysts, poor aeration, or using old water can cause bacterial blooms. Use fresh saltwater and proper cyst density.
- Unhatched cysts: May be due to old or improperly stored cysts, or inadequate aeration.
- Contamination: If you see unwanted organisms, try increasing salinity or using a clean, dedicated hatchery.
Brine shrimp hatchery
A few points to consider about what makes an ideal brine shrimp hatchery (the container you plan to hatch the shrimp in).
The ideal shape, for water flow and siphoning out the little snacks for your fish, is conical. You ideally want it to be wider across at the top than it is at the bottom.
The ideal brine shrimp hatchery also has a way to suck the nauplii out without getting cysts by accident.
Both of these design features will help you to target the tiny, swimming invertebrates while minimizing the number of unhatched cysts or empty (hatched) cyst shells, which will just look messy, floating around in your tank.
If you want, you can purchase a brine shrimp hatchery online. There are a surprising number of options available today:
Comparing hatchery designs:
- Conical designs (including DIY soda bottle setups) keep cysts suspended and concentrate nauplii at the bottom for easy collection. Bottom valves or spigots allow you to draw nauplii from below the floating cyst shells, reducing contamination in your harvest. These designs are best for maximizing yield and cleanliness, but require aeration and a bit more setup.
- Hatchery dishes (flat, maze-style) are simple and require no aeration or heating. They rely on the natural movement of nauplii toward light and physical barriers to separate them from cysts. These are lower maintenance and great for small batches, but may have lower hatch rates and are more prone to fouling if not cleaned regularly.
- DIY options offer flexibility and cost savings, but may require more hands-on effort to optimize for ease of collection and cleanliness.
Trade-offs: If your goal is maximum yield and minimal contamination, choose a conical design with a bottom valve and active aeration. If you want simplicity and don’t mind lower yields, a dish-style hatchery is convenient. For most hobbyists, a DIY soda bottle hatchery strikes a good balance.
DIY
DIY stands for ‘do it yourself’. You can make your own brine shrimp hatchery yourself out of just about any plastic container. I’ve hatched them in a simple, plain sports drink bottle sitting on a counter, and I’ve even made my own, based on a design described in detail in Joyce Wilkerson’s Clownfishes book (an awesome book, by the way, and totally recommended reading).
Bottle designs differ, so do not rely on a generic “cut the top” or “cut the bottom” rule. Follow the linked step-by-step design for the exact bottle orientation and cut location. Keep the assembled bottle stable, smooth or cover exposed cut edges, and route the airline so it delivers steady aeration without kinking or back-siphoning.
You can learn more about how to build a DIY brine shrimp hatchery here.
DIY Stand Combo
This next model, manufactured by San Francisco Bay Brand, is basically a stand and airline tube that is designed to fit with a 2L soda bottle.
This stand is designed to hold a 2L soda bottle in the orientation specified by its instructions. Follow the linked step-by-step guide for cutting and assembly, secure the bottle firmly in the stand, and confirm the airline is unobstructed before adding cysts.
It is a simple, long-standing option, but you still need to supply the bottle. Compare the stand’s fit, stability, included airline parts, and cleaning access with the other hatchery designs before choosing it.
Conical design
This model features a conical design, with a stand and a valve at the bottom of the tank, to make it easy for you to suck out the nauplii from the bottom. Just aim your light at the bottom and watch them swim down to the light…and suck them out, once they’re concentrated in a small area.
Alternative design
Believe it or not, there’s been some innovation in the brine shrimp hatching world. This brine shrimp hatchery dish is more of a dish than a cone and is designed to be super simple. No aeration or heating, just put in the maze and collecting dish, add the cysts outside the maze and watch as the shrimp hatch and separate themselves for convenient removal.
This is my favorite design because it is so easy to use.
Net
A brine shrimp net is simply a small net with a mesh size (the size of the gaps between the strands of netting material) that is small enough to catch the brine shrimp in it. This is a good thing to have because the hatch out water can become fouled and messy. You want to strain the water through the net to catch the shrimp but leave the dirty water behind.
Rinsing protocol: After netting your brine shrimp, it’s important to rinse them with clean, dechlorinated freshwater before feeding them to your aquarium. This removes excess salt, cyst shells, and any contaminants or fouled water that could degrade water quality in your display tank. Skipping this step can introduce unwanted debris or bacteria to your aquarium, so always give your brine shrimp a quick rinse in a separate container before use.
Brine shrimp facts
- Brine shrimp are among the most salt-tolerant animals on Earth, thriving in salinities that would kill most other aquatic life.
- They have been used in scientific experiments, including space missions to the moon and back.
- Brine shrimp are sold as “sea monkeys” in novelty kits, though hatching success can vary.
Bet you didn’t know that…
Conclusions
If you’ve never done it before, hatching your own brine shrimp can be fun. It’s a science project, all on its own, and it is easier to do than to bake some brownies. Plus, it’s a live food that your fish and corals will love to eat. If you’ve done it before, but haven’t lately, why not? When was the last time you gave your fish and corals some live food? Why not give it another try. Oh, and by the way, now that you’re done feeding your fish, why not take that suggestion and make some brownies too?
Cover image modified from a Creative Commons image on Flickr.