
If you have a reef tank, odds are you have a zoanthid or two. Or ten. Zoas get addicting. They’re a hobbyist favorite courtesy of the hundreds of potential colors and ease of keeping. And the popularity of these “corals” has prompted the move toward cultivating zoanthid gardens. If you have the space in your aquarium – and a little patience – you can create a stunning display. One that will leave you the envy of everyone on your block. Or, you know, everyone on Instagram.
Table of Contents: Zoanthid Gardens
Zoanthid gardens are only limited by imagination. Well, imagination and budget. And your ability to maintain a healthy saltwater aquarium. But, you know, those are trivial boundaries. If you’ve kept zoas healthy and thriving, upping the ante to a garden shouldn’t phase you. Just in case, though, you might want to review the links below. (Even “zoa thumbs” need a little gardening help)
- What are Zoanthid Gardens?
- Zoanthid Garden Supplies
- Setting Up Zoanthid Gardens
- Caring for Zoanthid Gardens
- Propagating Zoanthid Gardens
- For More Information
What are Zoanthid Gardens?
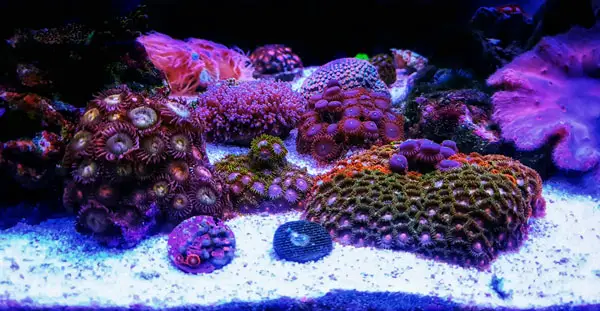
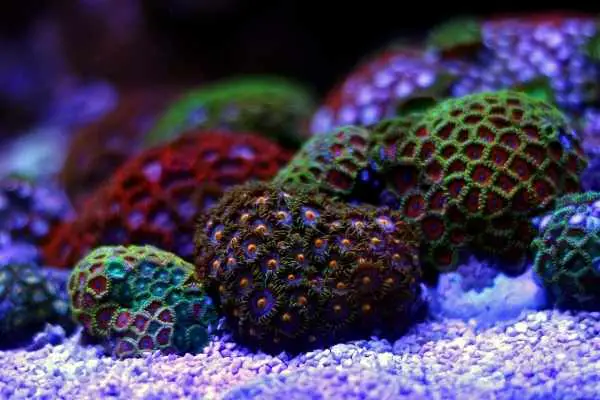
Zoanthid gardens are collections of zoas in reef tanks. When different varieties of these popular species grow together, creating patterns and colors, they put people in mind of a meadow or (you guessed it) garden. And the potential array you have to work with depends on you.
Even starting with plugs, you’ll see that zoanthid garden flourish in no time. The colonies grow over rigid structures, covering the surface with colorful mats. It’s a way to disguise the “ordinary” rocks in your tank if you don’t like the way they look. Or the garden can serve as an additional burst of pattern and activity within the aquarium.
Either way, it’s a new trend popular with hobbyists and photographers alike.
Zoanthids
Zoanthid gardens work so well because of the nature of zoas themselves. Zoanthids belong to the Zoantharia Order. You’ll see species listed under the genera of Zoanthus, Palythoa, or Parazoanthus. And while most people consider them part of the coral group, these cnidarians actually belong to the anemone family. You got it – they’re a colonial version of the typical sea anemone. Rather than forming a single pedal column, zoas develop a colonial mat.
Corals build their skeletons from calcium carbonate. Zoas? They use whatever materials happen to be handy. And that’s usually sand. You find a leathery texture to their “skin” rather than the hard shell of coral. It’s one of the critical distinctions between the two. Still, you usually find zoas for sale among the corals in fish stores. (The resemblance is hard to dismiss)
Unlike their mobile anemone cousins, zoas remain adhered to the rocks. The environment then dictates the size and shape (and even color) that develops. Zoanthids in shallow water with a faster current have brighter colors and shorter stalks. At the other end of the spectrum, deep water with a slower current will produce a duller palette and longer stalks. And in the middle? You can see anything. Including frills.
Zoas range in size from micro to jumbo. And if you can think of a color? You can find it. As hobbyists create new varieties, they develop “colorful” names. Once accepted by the aquaculture community, that name sticks. It’s how you come across types such as purple monster, pandora, and Sunny D. And if you’re looking for a blue morph? Start saving your pennies. It’s the rarest shade out there. Not quite the bank breaker some zoas have fetched, but rare all the same.
A Word on Palytoxin
Before you rush out and start purchasing zoas for your zoanthid garden, you need to keep something in mind. Some species possess a chemical known as palytoxin:
- Palythoa caribbean
- Palythoa grandis
- Palythoa mamilosa
- Palythoa nigricans
- Palythoa texaensis
- Palythoa toxica
Palytoxin disrupts the sodium-potassium pump within the cell membrane. To make a science lesson short, the sodium-potassium pump is in ALL of your cells. So the toxin wreaks havoc EVERYWHERE. It’s bad news. And while it’s easy to dismiss those species from your zoanthid garden list, there’s an extra problem.
Zoa colonies in proximity can ACQUIRE the palytoxin.
The transfer happens passively. Even other species (crustaceans, echinoderms, fish) manage to carry it around.
And if you happen to touch or breathe in palytoxin, you can end up sick. So working around or setting up a zoanthid garden involves safety precautions. You don’t want to get careless. Even if you KNOW your species are safe, you should still observe all safety measures. You never know what those crazy zoas might decide to do when you’re not looking.
Zoanthid Garden Supplies
Now that you’re ready to start your zoanthid garden, it’s time to get your supplies. Ideally, you should set aside one section of your tank for the garden. Zoas WILL overgrow whatever rigid surface you provide. And colonies grow quickly.
Decide whether you want to use a base structure of live rock, ordinary rock, coral rubble, or ceramic décor. Choosing structures you can remove will help with eventual zoanthid garden propagation (which we’ll get to). Or it’ll allow you to rearrange things easily. Keep the designated “garden zone” near sand, though. Zoanthids need sand to construct their colonial mat.
You want to keep your zoanthid garden safe from harm. As anemones, zoas possess a sting. But it’s not the strongest out there. Keep them away from Euphyllia corals. If you don’t, your garden will suffer overnight attacks from sweeper tentacles.
Once you have the perfect spot for your zoanthid garden, you’ll need the following:
- Eye protection
- Gloves
- Cutting tool of choice
- Coral glue (or a super glue gel)
And then the best supply: the zoas! Zoanthid gardens are your chance to mix colors, patterns, styles, and sizes. Think of your dream tank. Look through inspirational photos on Pinterest or Instagram to get ideas. Then pick up the zoa plugs that will get you to that perfect display.
Setting Up Zoanthid Gardens
Before you do ANYTHING, put your eye protection and gloves on. While you shouldn’t damage the zoa plug, they may experience irritation. And you don’t want to risk any aerosolization of the palytoxin. Even if you keep the tiny frags submerged, you don’t want to expose your skin. Safety first is the rule of the game when you’re playing with zoanthid gardens.
Now you can get started. Take your first zoa out of its bag. Remove any attachments and set them in the tank water. Repeat this for all of the plugs you purchased for your zoanthid garden. This gives all of the zoas a chance to acclimate.
Now it’s time to remove the plugs from their bases. Gloves still on? Good.
- Cut the zoa from the plug as close to the base as possible.
- Place it on the rock where you want that particular morph.
- Glue it in position.
- Allow the rock to soak for 30 seconds, so the glue hardens.
- Repeat for each of your zoas, leaving room for the individual morphs to grow.
- Allow your zoanthid garden to settle for at least 4 hours.
Ta-dah! You’re all set. The colonies will start growing and cover the rockwork you provided. And the better your care, the more dazzling their response.
Caring for Zoanthid Gardens
Managing zoanthid gardens isn’t any different from handling an individual colony. You’re just monitoring the health and well-being of a variety of morphs. But if you don’t set up the ideal conditions in the first place, you won’t get the stunning visual image you’re looking for. As easy as zoas are to handle, you still want to ensure you’re at the top of your game.
That means starting with the standard water parameters:
- Temperature: 76-81F (24.4-27.2C)
- Salinity: 1.023-1.025
- Alkalinity: 8-11dKH
- pH: 8.2-8.4
Generally, zoanthid gardens will handle a bit of “dirty” water. They don’t need pristine water conditions. (It’s the anemone in them) However, that doesn’t mean letting things get out of control. If you slack off and don’t perform routine checks, you’ll start seeing problems (which we’ll discuss in a moment)
As you can see in this handy YouTube video, zoanthid care isn’t difficult. And that’s why zoanthid gardens are easy to create:
Lighting
You can get away with various options for zoanthid gardens when it comes to lighting. (Well, not darkness. That’s off the list) They require SOME lighting input to feed their zooxanthellae, but they aren’t picky. When you’re starting with a fresh garden, though, err on the low side of things. New zoas are sensitive to change.
To get the best growth and appearance, position your garden in the middle of the tank. This will provide moderate lighting intensity. Then your zoanthids will receive the Goldilocks mixture, encouraging the most growth and the brightest colors. You don’t want them stretching too far on their stalks to get nourishment. That’s too stressful. On the other end, too much intensity will cause overexposure damage.
Water Flow
While zoanthids ARE anemones, they don’t wander. If conditions aren’t satisfactory, they’re stuck. And that means they suffer health issues. Some of those problems result from debris collecting on the surface of their oral discs. (Tentacles only reach so far) So it’s essential to pay attention to the water flow you set up for your zoanthid gardens.
You want to choose a current in the moderate-high range. This will flush away the waste the zoas produce and bring sand floating in. They need that sand to continue building the colony. If your powerheads allow it, though, a variable speed works best. Set up occasional bursts of high intensity. You’ll mimic the natural wave action of the ocean.
If you can’t adjust the settings, consider providing those changes yourself. You can use a turkey baster of tank water to get the same results. Just don’t go overboard. You’re only exerting enough “wave pressure” to close the polyps.
For brand new zoanthid gardens, turn things down. You’ll dislodge the colonies if you go too high with your water flow. You don’t want your poor zoas blowing around the aquarium. (That’s a bit stressful)
Nutrition
Zoanthid gardens are zooxanthellae machines. They produce all of the nutrients they need (provided you have proper lighting, of course). But if you want to boost the growth, you have the option of supplemental feeding. And it won’t hurt.
But keep in mind that not every species of zoa “eats” well. Palythoa are the better eaters of the zoanthid garden world. And even they can get picky about what’s on the menu. You may need to change the Special of the Day. But here are some options to get you started:
- Brightwell Aquatics Reef Blizzard-S
- Copepods
- Coral Frenzy Ultimate Coral Food
- Mysis shrimp
- Polyp Labs Reef-Roids
- Red Sea Reef Energy Plus
- Reef Snow
- Zooplex
To start feeding your zoanthid garden, turn off your pumps. (You don’t want food blowing around) Then sprinkle the food over the zoas and allow it to “sit” for at least 10 minutes. You can switch the pumps on after that.
If you’re looking for additional insight on feeding zoas, this YouTube video will walk you through everything you need to know:
Zoa Health
Zoanthid gardens are a thing of beauty. Until they’re not. Sometimes you walk out to see your little zoas looking less than their best. And understanding the underlying causes of the problems can help you remedy the issues and get that garden back to peak condition.
“Closed for the Season”
What good’s a zoanthid garden that doesn’t bloom? If you keep peeking into the tank and seeing closed zoas, you’re probably fretting. It’s one of the most common concerns with these easy-to-manage species. But the solution is also simple.
First, how old is your zoanthid garden? It can take up to a month before a zoa settles into a new home. All of that transport is stressful. And then you add acclimation to a new environment to the equation. Once your zoas adjust, they’ll open. So you may only need to give things a little more time.
If they’re not new, though, it’s time to dig further. Are your water parameters stable, or did something slip? Have any of the tank’s invertebrates started picking at the blossoms? Stress will cause zoas to close up. And an unhappy environment produces stress.
“I’m Melting!”
Believe it or not, zoanthid gardens can start melting. They look like oozing disasters. And that’s not the look you’re going for (at least, hopefully not). It’s a warning you have environmental problems in your tank, and you need to step in and fix things.
Double-check the light intensity for your garden first. When lighting’s too high, zoas start melting. Either shift your zoanthid garden lower in the tank or cut back on your light choice. Either should correct the problem.
Water conditions can also lead to melting zoas. Unhealthy water (improper parameters, excess waste, etc.) will stress those tentacles. But so will too little or too much water movement. If zoas don’t feel well, they droop. And that drooping eventually reaches epic proportions. Test your water and look at the settings on your powerheads.
“It’s the Plague!”
Some zoa varieties come with spots or stripes. But growths? That’s not something you see in fish stores. (Well, hopefully not) Tiny growths popping up in your zoanthid garden is a problem. It means you have zoanthid pox. (Nope, not making that up)
The growths usually show up first, followed by closed polyps. And the pox happily spreads through your tank. As soon as you notice those bumps, you need to start treatment. Antibacterial treatments usually do the trick but do your homework first. You don’t want to damage the biome in the remainder of your tank in the process.
Propagating Zoanthid Gardens
You love your zoanthid garden. But you feel it’s time to move one or more morphs to a new area. Or you have fellow hobbyists who’d love a frag from your garden. Fragging and propagating zoas aren’t tricky, but there are some precautions.
Of course, you need to use safety equipment at ALL times. That pest palytoxin is still hanging around. And since you WILL be cutting through the colony mat, the risk goes up. You don’t want to take risks. Put on eye protection and wear gloves. You’ll also need to add a mask. Cutting through zoas can aerosolize the palytoxin, and it’s NOT something you want to breathe in!
You also want to choose mature, healthy colonies. That means looking for zoas with at LEAST 12 polyps. Since you should remove 6-10 polyps to propagate a new zoanthid garden, you need a solid “mother colony” to start with. And you want to minimize the stress on your zoa. Waiting for colonies to “overgrow” is the best way to get appropriate sizes.
If you’ve never propagated zoas before, this YouTube video will walk you through the basics:
You’ll need to decide whether you want to cut through the anchor rock or not. If so, investing in a diamond saw blade is a good idea. You’ll get the cleanest cuts, inflicting the least amount of damage to the zoas. If not, a precision knife will work fine.
Wearing your safety gear, let’s get started on propagating a new zoanthid garden:
- Choose the section of the mother colony you want to remove.
- Cut through the zoa, including the mat.
- Put the mother colony in a tank to rest for 4 hours before returning it to the display aquarium.
- Same for the frag before it goes to its new spot (or home).
Zoas mount a defense when irritated. (And getting sliced up is irritating) They produce “slime” and other chemicals that warn off potential predators. That rest period gives them a chance to settle – without throwing your tank into chaos. You’ll need to change any activated charcoal media in the tank, though. Those chemicals are potent, and they’ll neutralize the charcoal.
For More Information
Zoanthid gardens are an exciting trend for reef tanks. With little work – and a lot of imagination – you can set up a stunning display. The hardest part is deciding what colors and patterns to choose. Zoas are the perfect option for anyone who loves gardening but hates digging around in the dirt. And if you need a little more inspiration, we’ve got you covered.
Such as this YouTube video on designing zoanthid gardens:
Looking for the perfect additions to your zoanthid garden? Try these:
Conclusion
Zoanthids already rank in popularity for their ease of care and the staggering volume of colors. Throw in the ability to create dazzling displays with zoanthid gardens, and is there any reason NOT to keep them? The colonies happily share space within one another. And you don’t need to worry about stringent care needs. It’s a win for everyone!
So how do you plan to design YOUR zoanthid garden?
References
- Borneman, E.H. 2001. Aquarium Corals.
- Calfo, A.R. 2002. Book of Coral Propagation: A Concise Guide to the Successful Care and Culture of Coral Reef Invertebrates: Volume 1.
- Wattenberg, E.V. 2007. “Palytoxin: Exploiting a novel skin tumor promoter to explore skin transduction and carcinogenesis.” American Journal of Physiology-Cell Physiology. 292: C24-C32.

Leave a Reply