With a little confidence, some patience, and a variable speed drill, you can put a hole in your tank. (A hole you WANT in your tank – not the accidental kind) I’m serious. Sure, you could buy a pre-drilled tank from your local fish store or pay someone else to do the job for you. But if you’re the adventurous type, you can accomplish the job on your own. And I’m the perfect guide on the road for how to drill a glass aquarium.
Table of Contents: How to Drill a Glass Aquarium
Yes, we’re going to delve into power tools and glass. And while you can use the links below to jump down to the instructions on how to drill a glass aquarium, this isn’t a task to take lightly. You might want to make sure you read the entire article before you start up the drilling process. (As a precaution. Safety first!)
- Why Drill a Glass Aquarium?
- “Nerves of Steel”
- Equipment to Drill a Glass Aquarium
- Bulkheads
- Preparations
- How to Drill a Glass Aquarium
- For More Information
- Conclusions

Why Drill a Glass Aquarium?
Maybe you’re wondering why someone would even want to know how to drill a glass aquarium. After all, isn’t the point of a tank to NOT have holes? And it is – unless you’re planning to use a sump tank or canister filter. Because these systems require bulkheads to connect to the filtration. And while you’ve probably heard “bulkhead” mentioned in your favorite Tom Clancy submarine novel, it’s actually a simple piece of equipment. The plastic seals a hole (in glass OR acrylic) to provide a waterproof conduit you can then connect to your canister or sump pipes. Of course, bulkheads don’t work unless you have a hole in which to insert them. And that’s where the drilling process comes in.
Do you NEED to drill into your tank and install a bulkhead? Of course not. You can install other filtration units and manage your water quality through daily or weekly water changes. But if you want to provide the best possible care to your display tank (or manage some of the more specialized species out there), sump tanks will turn into your best friend.
(Besides, who DOESN’T want the thrill of taking a power tool to glass – at least once in their life?)
“Nerves of Steel”
The best part about learning how to drill a glass aquarium is the sense of accomplishment you get when finished. And you don’t need THAT much to get started: a few tools, a steady hand, and some nerves of steel. The nerves of steel go to work during the first five seconds of the task (they just feel like the longest five seconds you invest in this hobby).
Before I took the plunge and drilled my first aquarium, I was tentative. Actually, “tentative” isn’t a strong enough word. I was TERRIFIED to take a moving, spinning, whirling piece of metal coated in diamond dust and apply it to my prized glass possession. And, quite frankly, I’ve only drilled 10- and 20-gallon (38 and 76L) aquariums for use on my aquarium rack. I’ve never attempted the process with my display tank.
But you can manage the process. You just hold your breath (figuratively – you WILL need to avoid passing out), grip the drill with white knuckles, and see if you have the constitution to complete this intimidating (but not that complicated) DIY task.
I’ll admit, I don’t have a perfect record. Out of the 10 tanks I drilled? Two cracked, and eight survived. So I’m not an expert. But I DO know the basics of how to drill a glass aquarium. Enough to get you started on the right foot.

Equipment to Drill a Glass Aquarium
Still ready to learn how to drill a glass aquarium? Fantastic. You’re going to need to make sure you have the proper tools for the job. After all, you ARE working with glass. And that means thinking through the process and picking up your equipment ahead of time. The RIGHT equipment – as in, tools that won’t lead to a trip to the hospital.
You may have some of these supplies already. But if you still need a few things? I have affiliate links to highly reviewed products on Amazon.
(If you’re not familiar with the way affiliate links work, Amazon provides me with a small commission if you buy a product after visiting via the links below. There’s no additional cost to you, and it IS one of the ways I offset the costs associated with this website. No pressure, but if you shop there anyway and want me to get a little credit, I thank you)
Sorry for the lame disclosure, but I think it’s important to remain transparent.
- A copy of this “How to Drill a Glass Aquarium” article
- Variable speed drill you can know how to operate, with low-to-medium speeds
- Diamond-coated drill bits of appropriate size (see chart below)
- Bulkhead (you got it – the chart’s coming up)
- Plumber’s Putty
- Water and water bottle capable of squirting
- Disposable packing material or padding
- A glass aquarium made with NON-TEMPERED GLASS
- Safety equipment (gloves, safety glasses, GFI outlet if using electricity nearby)
- Clean-up supplies
- A stiff drink (if age appropriate) to celebrate your accomplishment

Bulkheads
Everyone wants to dive straight into how to drill a glass aquarium. But it’s important to stop and make sure you’re thinking through the size of the HOLE you’re putting into the tank in the first place. And that means looking at your bulkhead and drill bit choices. When shopping for a bulkhead and diamond-coated drill bit, pay close attention to the product descriptions. There are two numbers you need to confirm:
- The size of plumbing the bulkhead will accommodate
- The diameter of the hole you need to cut
Now, you need the bulkhead’s information to figure out the hole’s diameter (not the reverse order). For example, a bulkhead fitting for a one-inch PVC pipe requires a 1 ¾ inch hole (and the packaging information will explain that for you). Always read the specifications carefully when you purchase your bulkheads and make sure you purchase the proper drill bit.
Here are a few examples of common bulkhead sizes and the corresponding hole you cut:
|
Bulkhead Diameter |
Hole Size |
| 1/2 inch | 1 and 1 /8 inch |
| 3/4 inch | 1 and 1/2 inch |
| 1 inch | 1 and 3/4 inch |
| 1 and 1/2 inch | 2 and 3/8 inch |
| 2 inch | 3 inch |
(Source: Vivarium Works)
Preparations
Obviously, you can’t rush straight into applying a drill bit to a tank – even if that sounds like the routine for how to drill a glass aquarium. You need to make some initial preparations first. You’re working with some dangerous materials (and I’m not only referring to the drill!). If you don’t take your time with the process, you will end up with a broken tank. Or – at the worst – you could find yourself making a trip to the hospital.
Drilling a glass aquarium is loud and potentially messy. So make sure you invest in proper safety equipment. And take the time to make these preparations. It’ll save you some of the anxiety you may already feel.
- Clean the glass aquarium – inside and out. Pay special attention to the area you’re about to drill. You want to avoid any dirt, gravel, or other substances interfering with your drill.
- Create a dam around the drilling area with a small amount of plumber’s putty. Smooth it out in a circle, a little larger than your drill bit.
- Fill the area inside the dam with cool FRESHWATER to lubricate and cool the drill bit. (Saltwater contains dissolved minerals that can interfere with the process)
- Place newspaper, bubble wrap, or another disposable padding inside the tank to catch the glass when it breaks free. This will also collect any other glass debris that results when you drill a glass aquarium.
Finally, never neglect your safety equipment. You ARE using a power tool and applying it to glass. Even the pros out there (who you can turn to if you feel squeamish) don safety goggles and gloves when they drill holes in tanks for people. Glass doesn’t always work the way people want. And if a piece breaks wrong? You don’t want to have it fly toward your unprotected hands or face.
(Incidentally, preparing to drill a glass aquarium AWAY from children, pets, and significant others is also a good idea)

How to Drill a Glass Aquarium
Ready to learn how to drill a glass aquarium? You’ve practiced your breathing techniques? Haven’t had too much coffee? (Jittery hands on a power drill aren’t the best combination here) You double-checked all of your measurements? (Measure twice, cut ONCE)
Great! Let’s get to work.
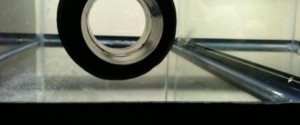
Obviously, the first step in how to drill a glass aquarium (following your prep work) is to actually DRILL. Hold the drill bit inside the “pond” of freshwater you formed with the putty dam. You want to keep it at an angle with the glass (don’t go straight up-and-down). You’re only looking for a small part of the bit to catch and start grinding. (You’ll know it’s working because you’ll hear a pretty horrible sound) Your goal is to press ONLY hard enough to keep the bit in place without the drill kicking out of your hand.

Now that the bit’s caught into the glass apply a light, constant pressure. NOW you can slowly tilt the drill upright. You also start to extend the groove in the glass outward from the initial cut. By the time you have the drill standing upright (“leveled out”), you’ll wear a fine groove into the aquarium glass in a complete circle. It WON’T go through the full thickness of the glass, and that’s okay.

Continue drilling using slow to moderate speeds while applying constant, gentle pressure. You WILL grind completely through the glass wall, but expect it to take about 3-5 minutes for a 10-20- gallon (38-76L) tank. Thicker glass takes longer to drill than thinner glass. Have that water bottle nearby to squirt the drill bit, keeping it cool and lubricated as you work. (Friction causes heat, and you’re creating a lot of friction, applying a diamond drill bit to glass)
I found a comfortable, cautious pace worked for the first time. If you rush, you run the risk of causing the bit to “kick out.” This results in scratching the aquarium glass and probably stopping your heart as the drill jumps around in your hand and hits the other walls of the tank. If that happens, breathe (maybe take a time out for some yoga), and start over at the beginning of the groove so you can work the drill upright again.

Once the drill bit punches through, the water inside the dam will drain through. However, this doesn’t mean you can cheer and celebrate quite yet. Now it’s time to take care of the cleanup portion of the drilling work. And this involves MAJOR safety work!
Use extreme caution to clean up. The milky-white “sand” you see is actually sharp glass. The inside of the hole you cut is sharp glass. The outside of the circle that you punched through is sharp glass. (Did I mention sharp glass?) I did not wear safety equipment on my hands the first time to set out to drill a glass aquarium, and I was picking tiny shards of glass out of my fingers for a few days. Nothing caused major bleeding or cuts, but I ended up with constant, raw irritation.
Don’t be like me. WEAR YOUR GLOVES!
Carefully clean and dry the glass before installing the bulkhead according to the directions listed by the manufacturer.

Important Reminders When You Ask How to Drill Aquarium Glass
Obviously, I could list an endless supply of reminders. When you start working with a topic like “how to drill aquarium glass,” plenty of concerns come to mind. But I don’t want to turn this into a major lecture. (After all, I’m not an expert on the subject) So I’ve distilled my wisdom – such as it is – into these handy reminders. And as long as you tuck them into the back of your mind, you’ll get yourself off on the right foot:
- Think of this process as slowly grinding away the glass rather than drilling through it. That’s why it takes so much time (and creates all of that noise)
- Don’t EVER try to drill tempered glass. Odds are, you’ll see a “Do Not Drill” sticker on aquariums of tempered glass. But you want to make sure. Tempered glass is also known as safety glass. And when you add pressure (such as a drill bit), it SHATTERS into tiny pieces. I can’t tell you how to drill aquarium glass for these tanks. You’ll need to ask your local fish store for help there.
- Along those lines? The bottom of most tanks usually has tempered glass. As such, you don’t want to attempt to drill through the bottom. Not to mention that you can struggle to balance the tank for the drilling process in the first place. Stick to the sides.
- Practice on a spare aquarium first. You’ll build up your confidence before you attempt to drill your display tank.
For More Information
I DID crack two out of ten tanks, in all fairness, ending up with eight success stories. So if you ARE taking a drill to the glass, you could lose the whole tank. If you’re not comfortable with that risk, you may want to trust the task to an expert (or purchase a pre-drilled aquarium). But if you think you have the courage to do it yourself, I hope this guide on how to drill a glass aquarium was helpful. And I’m happy to supply some additional information to bolster and encourage you!
To see the drilling of a glass aquarium in action, check out this YouTube video:
Now that you know how to drill your aquarium to insert an overflow, the next step is to install an aquarium sump.
This YouTube video will explain why sumps are one of the best investments you can make (and why you need to know how to drill a glass aquarium):

Conclusion
What I like most about the aquarium hobby is the opportunity to create, design, and personalize our tanks. We get to create an aquatic footprint. When I overcame the irrational fear (okay, somewhat irrational) of drilling my aquarium, I found it liberating and fulfilling, And I was able to take my aquarium design to the next level.
I encourage you to take a deep breath and follow me into the plunge by practicing on a spare aquarium and build up your confidence. And when you feel like you’ve mastered how to drill a glass aquarium? You can drill your display tank.
Written by Al Ulrich III

Leave a Reply