The role of a DIY larvae snagger
Here is a question I have heard a few times:
Help! I have clownfish laying eggs in my tank. How do I raise the young?
Have you ever had this happen to you? The best and easiest thing you can do is take the rock that they laid the eggs on and remove it to a separate tank for hatching and growing out the larvae.
But I know from personal experience that you can’t always do that. If you have clownfish, or any other fishes spawning in your tank and you have no way to relocate the eggs to a different tank before they spawn, your best option is to use a larvae snagger. A larvae swagger is a device that attracts and traps the larvae in your tank so that you can remove them to an alternate tank later on.

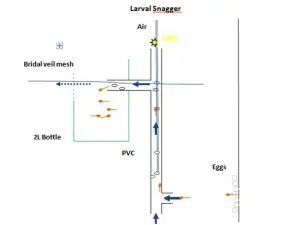
Here is the design for a DIY Larvae Snagger I built out of a used soda bottle (mine is Diet Mountain Dew, the nectar of the gods).
DIY Larvae Snagger:
Here was my own personal situation. The clownfish stopped spawning in the clay flower pot (which was easy to move to the hatch-out tank on the night of the hatch) and started spawning again on the glass side wall of the aquarium. Since the change in the spawning substrate, I have struggled with harvesting collecting larvae on the night of the hatch. I tinkered with a few different designs for a larval snagger and ultimately landed on the one in the image here.
The most recent clutch of eggs was laid on the glass on March 16th and hatched around 10pm March 23rd.
Supplies:
- 2L soda bottle (you get to pick the soda and drink it first)
- Small swatch of fine mesh bridal veil
- Airline and pump
- ¾ inch PVC pipe
- 2 x ¾ inch PVC tee connectors
- Aquarium silicone
- Superglue
- Light source (‘clamp’ style desk lamp is what i used)
- Magnetic glass cleaner (Mag float style–to hold the snagger in place)
I set the snagger up at 8pm and shut the lights out. By 10pm, about 75% of the eggs had hatched. The snagger worked–about half of the larvae were already in the snagger. I transferred the larvae, at that point, into the grow-out tank (a five-gallon black bucket). A few hours later, a large number of larvae were in the snagger or grow-out bucket.
So what made the difference? In previous versions, the snagger ended with a straight piece of PVC (opening on the bottom). In the current version, the bottom piece is a PVC ‘tee’, which is open at both the bottom and side. Anecdotal observation suggests that this improvement allowed me to snag more larvae, as they tended to swim around or ‘near’ the PVC, almost bumping it with their heads and then slowly traveling up or down. In the even they traveled downward, they were quite easily ‘sucked up’ into the side port now available because of the ‘tee’.
Because of the design elements of the PVC ‘tee’, and acquisition of some additional ‘scrap PVC’ from a local hardware store, I was also able to place the snagger at what seems to have been a better height (vertically placed the side opening around the middle of the clutch).
In the end, the ‘up and over’ pipe is my favorite design. I did not have much success with collectors that just bubbled straight up. This is based on a template I originally read about on MOFIB.org.
DIY Larvae Snagger Video 1
DIY Larvae Snagger Video 2


Leave a Reply