Once you decide to connect multiple tanks together – either for breeding or to have a sump – you need an aquarium rack. And once you have the rack? It’s time to worry about plumbing. The drains and lines allow you to streamline water flow throughout the tanks and the entire system. Now, you’ve made it through the whole process (hopefully) handling things on your own. And you can continue to do so. In other words, there’s no need to hire a plumber to connect your pipes. But you want to make sure you understand the plumbing process before you start playing with this kind of volume of water.
Table of Contents: Plumbing Your DIY Aquarium Rack
Can you throw a few pipes and valves together and hope for the best? In theory, sure. Will you end up needing to call that plumber when things break down? Probably. If you want your plumbing to hold up and function (to say nothing of the fish in your aquarium rack), it’s best to understand what goes into the basics of moving water from one place to another. So while you CAN skip down to the links on setting things up, it’s best if you stick around through everything and get an idea of the basics. (I promise not to get too technical on you)
Plumbing Flow Rates
Before you start throwing your pipes and drains onto tanks, you need to do a TINY bit of math. If you don’t, your plumbing is doomed to fail. That means you can expect to see leaks and flooding. (Not something you want for your gorgeous fish room – or even in the average basement) To set up a proper aquarium rack, you need to calculate your flow rate. Flow rates are nothing more than the amount of water you’re going to push through the system. Flow rates are stated in gallons per hour (GPH) or liters per hour (LPH), depending on your country of residence.
For sumps, the average flow rate is TEN TIMES the display tank’s volume. That’s easy enough to calculate. If you have a 100-gallon (379L) display tank, you need 1000gph (3790L) of flow. It’s a rough guess (you might have extra equipment – such as a refugium – in your sump), but it provides a nice round number to work with. Also, it’s math most people can handle without breaking out the calculator.
Loss of Flow
Now that you have a number in mind, it’s time to start subtracting. No plumbing set-up follows a straight line. And aquarium racks aren’t an exception. That means you need to consider the loss of flow. That will help you decide on the material you need (which we’ll discuss in a minute) and choose the pump you need for your return lines. (After all, you need to get the water back INTO the system at some point)
To calculate the loss of flow, you can use for rough estimates to start whittling down everywhere you lose pressure in your plumbing:
- Every foot/meter of height equals 75-125GPH/284-473LPH
- A 90-degree elbow subtracts 50-75GPH/189-284LPH
- A 40-degree elbow takes away 30-50GPH/114-189LPH
- If you add a swing check valve, take away 50-75GPH/189-284LPH
- Need a ball check valve? That’s 20-40GPH/76-151LPH
- And every union of pipe eliminates 3-5GPH/11-19LPH
So look at your aquarium rack and decide how you want to lay out your plumbing. Figure out your “official” flow rate. Have the number in mind? Good. You help control flow rates with the material you choose for plumbing your aquarium rack.
Material Types
You can’t skimp on your choice of pipes and fittings for your aquarium rack plumbing. If you don’t want to harm your fish and invertebrates, you need to choose materials intended for potable water. (That means drinking water, by the way) You’re not planning to sample your tank water, but it’ll prevent gross bacteria from accumulating in the plumbing system. You also need materials that won’t corrode or develop scaling. And that means one of the following options:
- ABS: Acrylonitrile Butadiene Styrene shows up in drainage systems for houses. It doesn’t handle pressure or heat very well, but it’s cheap. ABS is black, so it’s easy to find on the shelves. If you have ANY kind of pressure in your aquarium rack, skip it. (Reserve it for gravity systems)
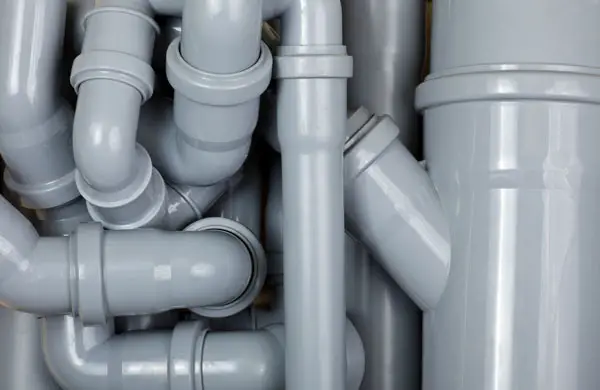
- CPVC: Chlorinated Polyvinyl Chloride pops up in construction and industrial sites. You can tell it apart from PVC (which we’ll get to in a second) due to its grey color. It’s perfect for aquarium rack plumbing, but it’s EXPENSIVE.
- PEX: Cross-Linked Polyethylene is replacing PVC in homes. It’s flexible AND rigid and handles pressure without a problem. You’ll see a white, translucent shade to PEX. It tops CPVC in terms of cost, and you’ll also need to rent special tools to work with it.
- PVC: Polyvinyl Chloride is the go-to for most hobbyists. The white piping fits most people’s budgets, and it’s easy to work with the white piping. You can find rigid OR flexible options (flexible won’t handle as much pressure).
Every type of plumbing material falls under a schedule. The schedule correlates to the flow rate the pipe can handle. Most aquarium racks fall under Schedule 40 piping (up to 5500GPH/20820LPH), which is around 2 inches (5cm) in diameter. If you’re linking giant tanks and need a higher flow rate? Move up to Schedule 80. If you’re working with PVC, it’s easy to tell the difference. Schedule 40 pipes are white, and Schedule 80 are grey. (But check the labels to make sure)
If you want to decide on the EXACT size of pipe you need to meet your flow rate, you can refer to the tables below. It’ll give you an idea of the materials you’ll need to purchase for your plumbing.
| Flow Rates Based on Pipe Size | |||
| Gravity ONLY (No Pressure Added) |
Average Pressure (40-100PSI) |
Maximum Pressurized Flow | |
| PVC Pipe Size | GPH | GPH | GPH |
| 1/2″ | 200 | 840 | 1260 |
| 3/4″ | 400 | 1410 | 2160 |
| 1″ | 600 | 2200 | 3150 |
| 1.25″ | 1000 | 3750 | 5940 |
| 1.5″ | 1400 | 4830 | 7560 |
| 2″ | 2200 | 6750 | 12000 |
| 2.5″ | 3200 | 11400 | 17550 |
| Flow Rates Based on Pipe Size | |||
| Gravity ONLY (No Pressure Added) |
Average Pressure (40-100PSI) |
Maximum Pressurized Flow | |
| PVC Pipe Size (cm) | LPH | LPH | LPH |
| 1.3 | 757 | 3180 | 4770 |
| 1.9 | 1514 | 5337 | 8176 |
| 2.5 | 2271 | 8328 | 11924 |
| 3.2 | 3785 | 14195 | 22485 |
| 3.8 | 5300 | 18284 | 28618 |
| 5.1 | 8328 | 25552 | 45425 |
| 6.4 | 12113 | 43154 | 66434 |
Plumbing Set-Up
Onto the fun part of plumbing! (Well, you know – compared to all of the math of flow rates) It’s time to set up your aquarium rack plumbing and get your tanks in sequence. You’ll want to make sure you have the appropriate fittings to attach all of your pipes. This may mean typical PVC unions, or you can go for bulkhead flanges. (Note: This WILL mean cutting through the tank to obtain a proper seal) You’ll also need valves to control the movement of water through the system. Most aquarium racks employ three types of valves:
- Ball Check Valve: A ball check contains a (you guessed it) ball inside the valve. It’s designed to keep water moving in ONE direction. Pressure moves the PVC ball away from the narrow part of the valve, allowing the water through. As pressure falls, the ball drops back down and seals the valve closed.
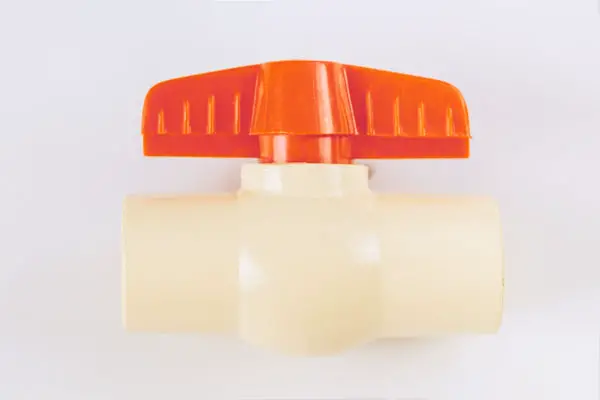
- Ball Valve: Don’t confuse this with the ball check valve. You use ball valves to adjust the flow of the water or turn it off. As you twist the handle, you move an opening inside the rounded portion of the valve. This slows down water or shuts it off completely.
- Swing Check Valve: This valve keeps water flowing in ONE direction. As pressure builds up behind the “door” inside the valve, it pushes it open. The same pressure slams the door shut to prevent water from sneaking in the other direction. They’re popular features on return lines. (The last thing you want is your sump getting overwhelmed – say when the power goes out)
You also need to decide how you want to connect your plumbing. The easiest method – especially when you’re going the DIY route – is to use threaded fittings. These screw together and don’t require you to have knowledge of pipe fitting. All you need is thread tape to ensure you don’t get any leaks down the road. Wrap the tape around the threads in the OPPOSITE direction as tight as you can. Then twist the two pieces together.
ALWAYS make sure you use two materials of the SAME type. Otherwise, you’ll find yourself with issues down the road. Different plumbing materials have different expansion rates as they warm or cool. And that can lead to leaks – even with the best thread tape job in the world. So if you start with PVC pipes, go for PVC elbows and valves.
You CAN use solvent welding. (Don’t worry, you won’t need a welding helmet for this method) It’s basically gluing your plumbing parts and pieces together. (But solvent welding sounds WAY cooler) You’ll need to find the proper solvent for your material, and you MUST work in a well-ventilated area. You’re also going to need a primer to start the process. It’s slower, requires more cautions to keep YOU safe, but you’ll end up with an unbreakable fitting when you finish.
Whichever method you choose, allow everything to set for 24 hours. Then give it a test to check for leaks. You don’t want to throw your fish into their tanks and turn everything on to find out you missed something and have water pouring out.
My Plumbing Design
Since you’ve followed me on my DIY aquarium rack journey, it’s only fair that I show you my plumbing job. Maybe it’ll provide you with ideas for your designs. (Or you can simply marvel at my amateur plumbing capabilities. I’m good either way)
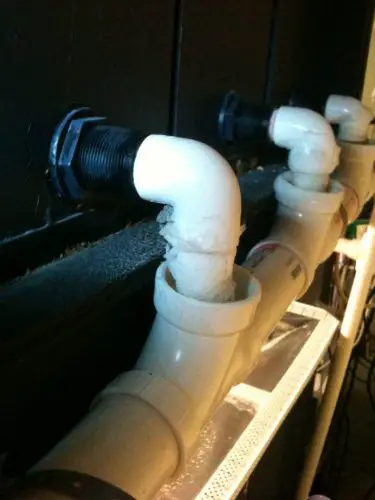
To begin with, each tank is drilled and connect to 1-inch (2.5cm) bulkheads. They then enter 90-degree elbows that feed into 2-inch (5cm) drain lines, as you can see in the image below. I used solvent welding to achieve my connections. Though, as you can see below, the transition from the tanks to the drain line didn’t require a fitting. All I needed to do was make sure I lined up the elbows with the openings. (You can follow that pattern, too!)

I use a single drain line (running horizontally) on each of the shelves. The drain lines then connect to another 90-degree elbow that runs down to my sump tank (a standard 75-gallon/284L aquarium). Once the water cycles through the sump, a MAG-12 pump pushes everything through a 3/4″ (2cm) PVC return line. And everything’s regulated courtesy of a series of ball valves (as you can see below).

Simple, easy, and functional.
For More Information
And there you have it! Plumbing for fun and profit. Just kidding. But this can help you get your aquarium rack up and functioning. It takes a bit of know-how and some math before you hit the store, but you can get yourself working through the schematics in no time. And just in case you want a tiny bit of extra assistance, there’s some additional information below on aquarium plumbing to make sure you have everything you need.
Have a little spare time? This YouTube video does a deep dive into installing the plumbing on your aquarium rack:
Or you can watch this shorter video on simple plumbing options:
Maybe you’re ready to look into the options an aquarium rack can offer:
Leave a Reply